Stay up to date
NFAA News
NFAA News
Jan 04, 2019
The Basics of Indoor Bow Building

[embed]https://youtu.be/6bXd4GqPcXc[/embed]
Increasing Fall Bowhunting Success Through Indoor Archery
With the vast majority of bow seasons ending across the country, most bowhunters are already looking to find ways to increase their odds of success for next year. Although we as bowhunters will employ dozens of cameras across the farms we hunt, put hundreds of miles on boots scouting public lands, search for sheds high and low, and spend countless dollars on hunting equipment that's lighter, stronger, or more effective...rarely do we put time into what really matters: our ability to consistently deliver an arrow to its target with as much precision as possible.
The NFAA (National Field Archery Association) is an organization built by and for bowhunters that has evolved into the largest bowhunting and target organization in the country. This makes it the perfect place to look first, when deciding to build your shooting skills and increase your effective range. Not only will you find like-minded individuals that are almost always willing to help you improve your shooting at affiliated clubs, you'll also meet some great people that may even become some of your best bowhunting buddies!
Indoor target archery is just one of the shooting formats that the NFAA offers as a way to get involved, and it's also the easiest way to get your feet wet in learning about target archery. NFAA rounds feature two basic types of indoor target faces in 2 different formats each. The classic blue and white face comes in a single spot or a 5 spot configuration. The iconic Vegas target face comes in a 3 spot or single spot configuration. There are multiple scoring formats involved with these faces but all of the shooting indoors is done at 20 yards.
Building an indoor target bow and giving it a basic tune is easier than one might think. I would argue that building an indoor rig is considerably easier than building other target setups. Building up hunting bows, field bows, and long distance bows, demand a much higher level of understanding in the relationship between the bow and arrow, than building an indoor target bow with the intention of shooting just 20 yards. When distance, angles, terrain, and weather all become a factor, there are multiple things to consider that we simply can set aside when shooting in a controlled, indoor environment.
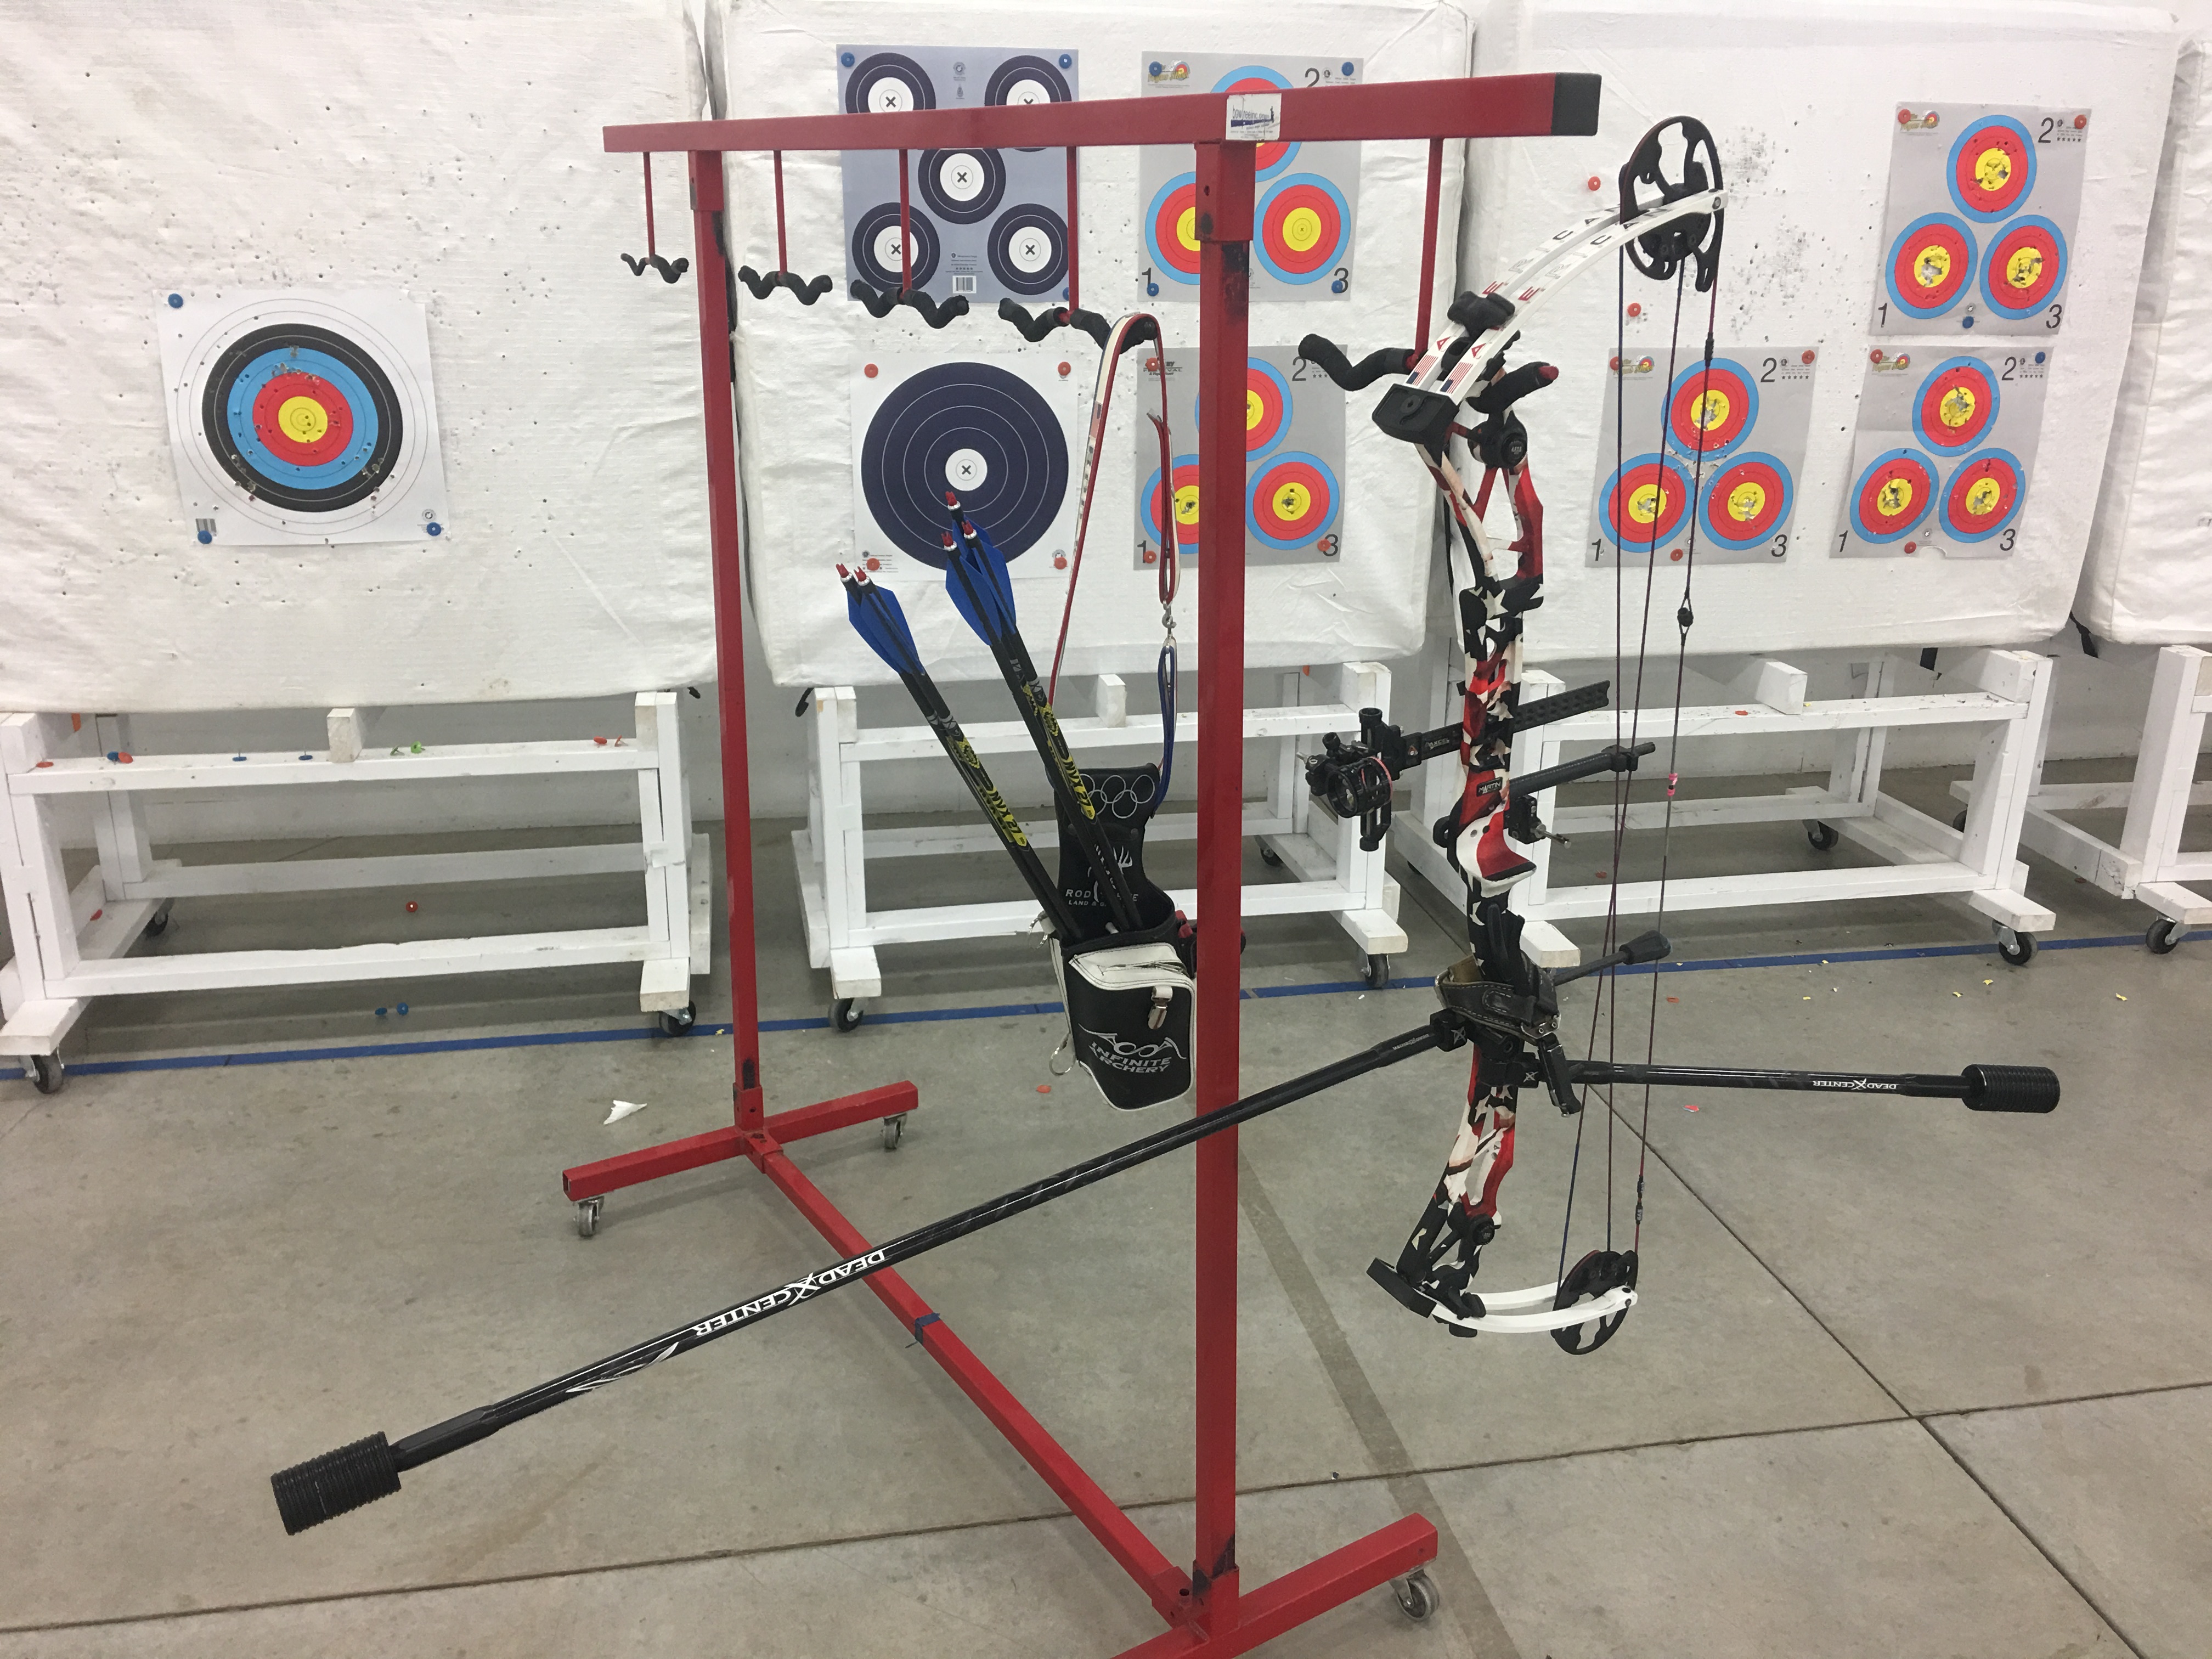
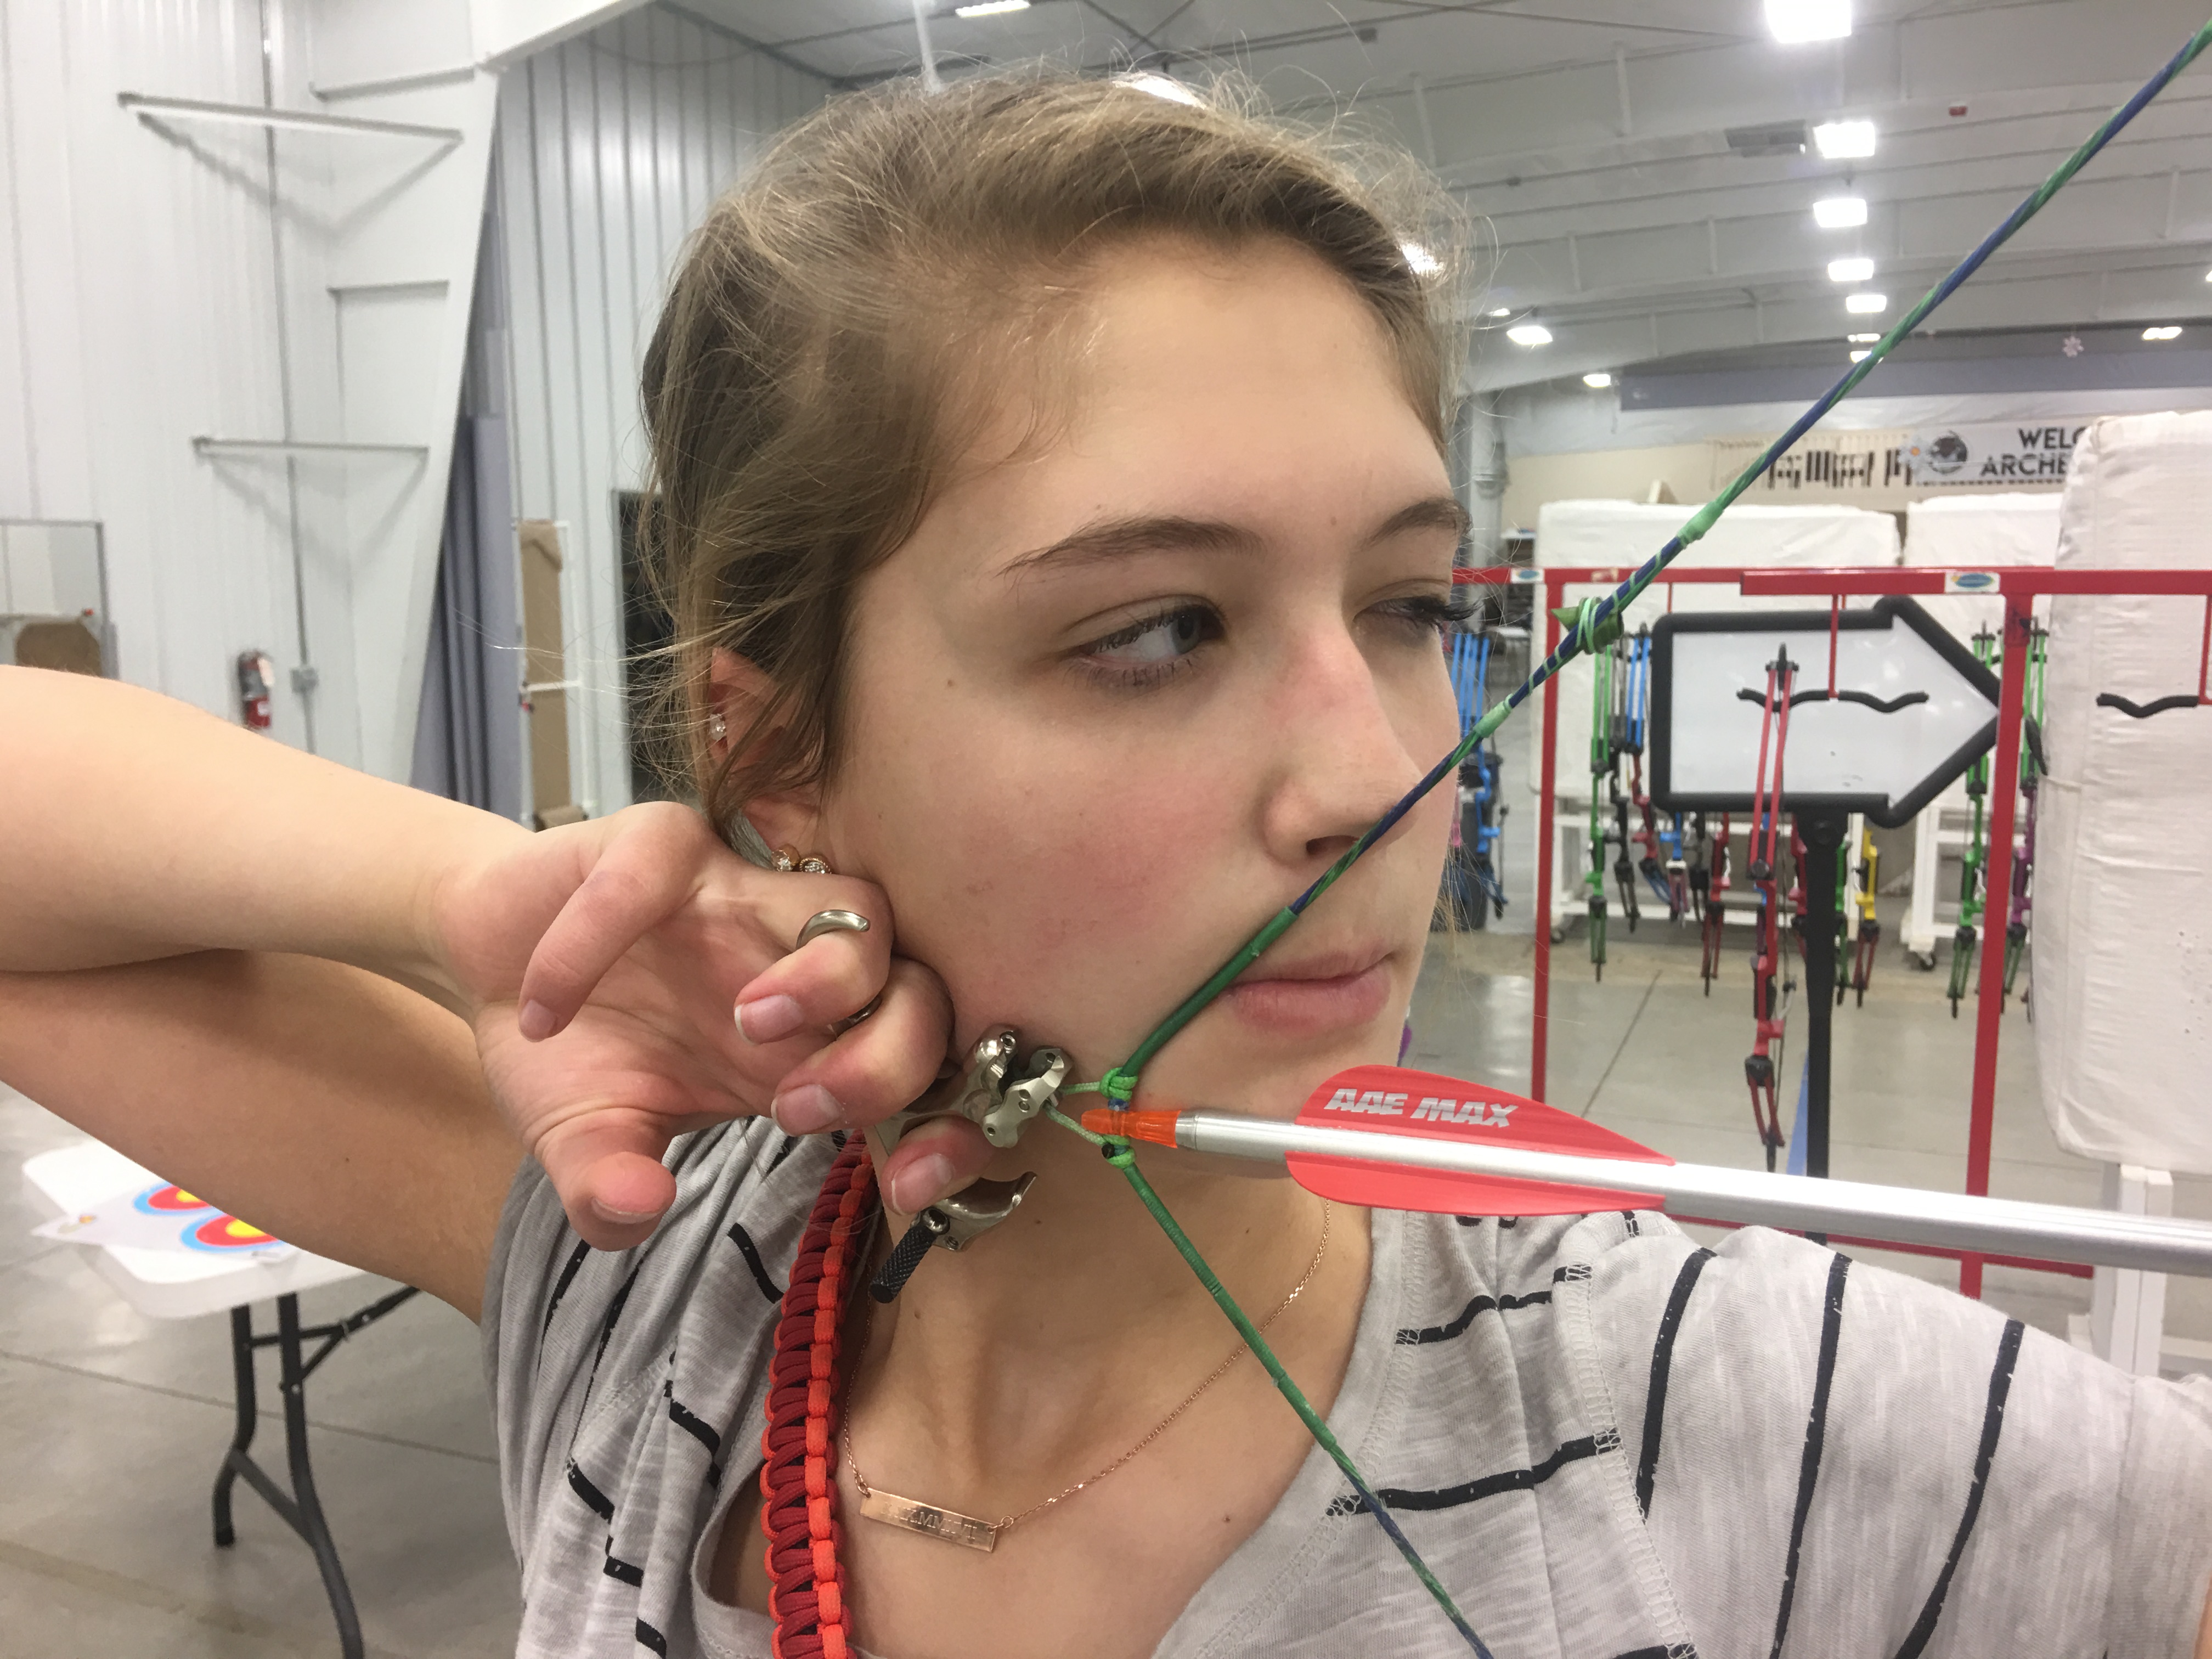
Before we actually begin the tuning process, let's take a look at the typical type of setup that most competitors and indoor archer's tend to use. There are a number of different classes and equipment configurations that can be entered into NFAA tournament and recreational shooting. For the purpose of this article, I'll be walking you through a typical "Freestyle" type of setup. This setup generally features a compound bow, a movable sight with a scope and often a lens, an adjustable arrow rest, a peep sight, a front stabilizer bar with adjustable weights, and a rear stabilizer bar, or bars, with adjustable weights. As far as the bow goes, you're current hunting setup will work just fine if you're interested in trying all of this out before purchasing a specialized setup. Even if your intention is to only use your hunting bow in local league nights or local shoots, I would still consider it beneficial to read through this part of the series. Most of your equipment for those of you that are bowhunting, will fall into the "Bowhunter" class setup and you can certainly use that current setup at local leagues, state, and national shooting events. Provided you remove your broadheads and shoot only field or target points of course!
If you're interested in purchasing a new bow, the perfect indoor bow for you is also the perfect field and outdoor target bow as well. Most target bows, if I were to generalize (because there are a ton of exceptions to this), that archers shoot extremely well, seem to be in general 36" to 40" in length. That's measured from the center of the axle that the top cam rotates on, to the center of the other axle where the bottom cam is located. Referred to of course, as the axle-to-axle measurement. Most indoor shooters also shoot from 50-60 lbs in peak draw weight. Additionally, most archers prefer bows with a 65% to 75% let-off for shooting any kind of spot target rounds. This is referred to as your "holding weight" by most. Brace Height, the distance from the deepest point in your bow grip to the main string, is often in the 6" to 8" range. So much consideration for some of these things are very individualistic because of your shooting form, your height, arm length and strength.
The type of release you shoot and how you anchor, the way the string lays on your face, the amount of holding weight you choose, not to mention what's comfortable for you in the physical or mass weight of the bow you choose...all of that is personal preference. One thing, when it comes to targets, that I would not stress out on, is the bows speed rating. It's generally tied closely to brace height and cam types, but I would suggest starting with a bow that has an easy to draw, draw cycle. This refers to the way the bow increases in poundage as you pull it back and how fast it drops in weight once it's reached its peak weight. Typically, bows with high let-offs are not as smooth drawing as a bow with a low let-off. Last year I shot BowTech Fanatic 2.0's, they fit me extremely well and the axle-to-axle length gave me a solid anchor with the type of release I was shooting and the string comfortably just touched my nose. This year I'm shooting a Martin Axon 40 for indoors, the string angle is not nearly as steep. As a result, I've had to adjust my release length to make it fit more comfortably and now I feel like I have it securely and consistently anchored to my face at full draw. That's extremely important for consistency from shot to shot and extremely important to how well I can aim a bow. Of all the things I'm going to discuss in this article, I feel like recommending a bow of any particular shape, size, or with any specific criteria other than the generalizations I gave above, is not something I can say is right for you as a reader. It is something that you will have to be fit for by a quality professional bow shop that deals in target bows regularly. Most all brands of bows out there now have a quality target bow. Your budget, preference in looks, and brands that are carried by your local pro shop are all things to be considered. Most importantly, the fit of the bow to you, is what is critical!
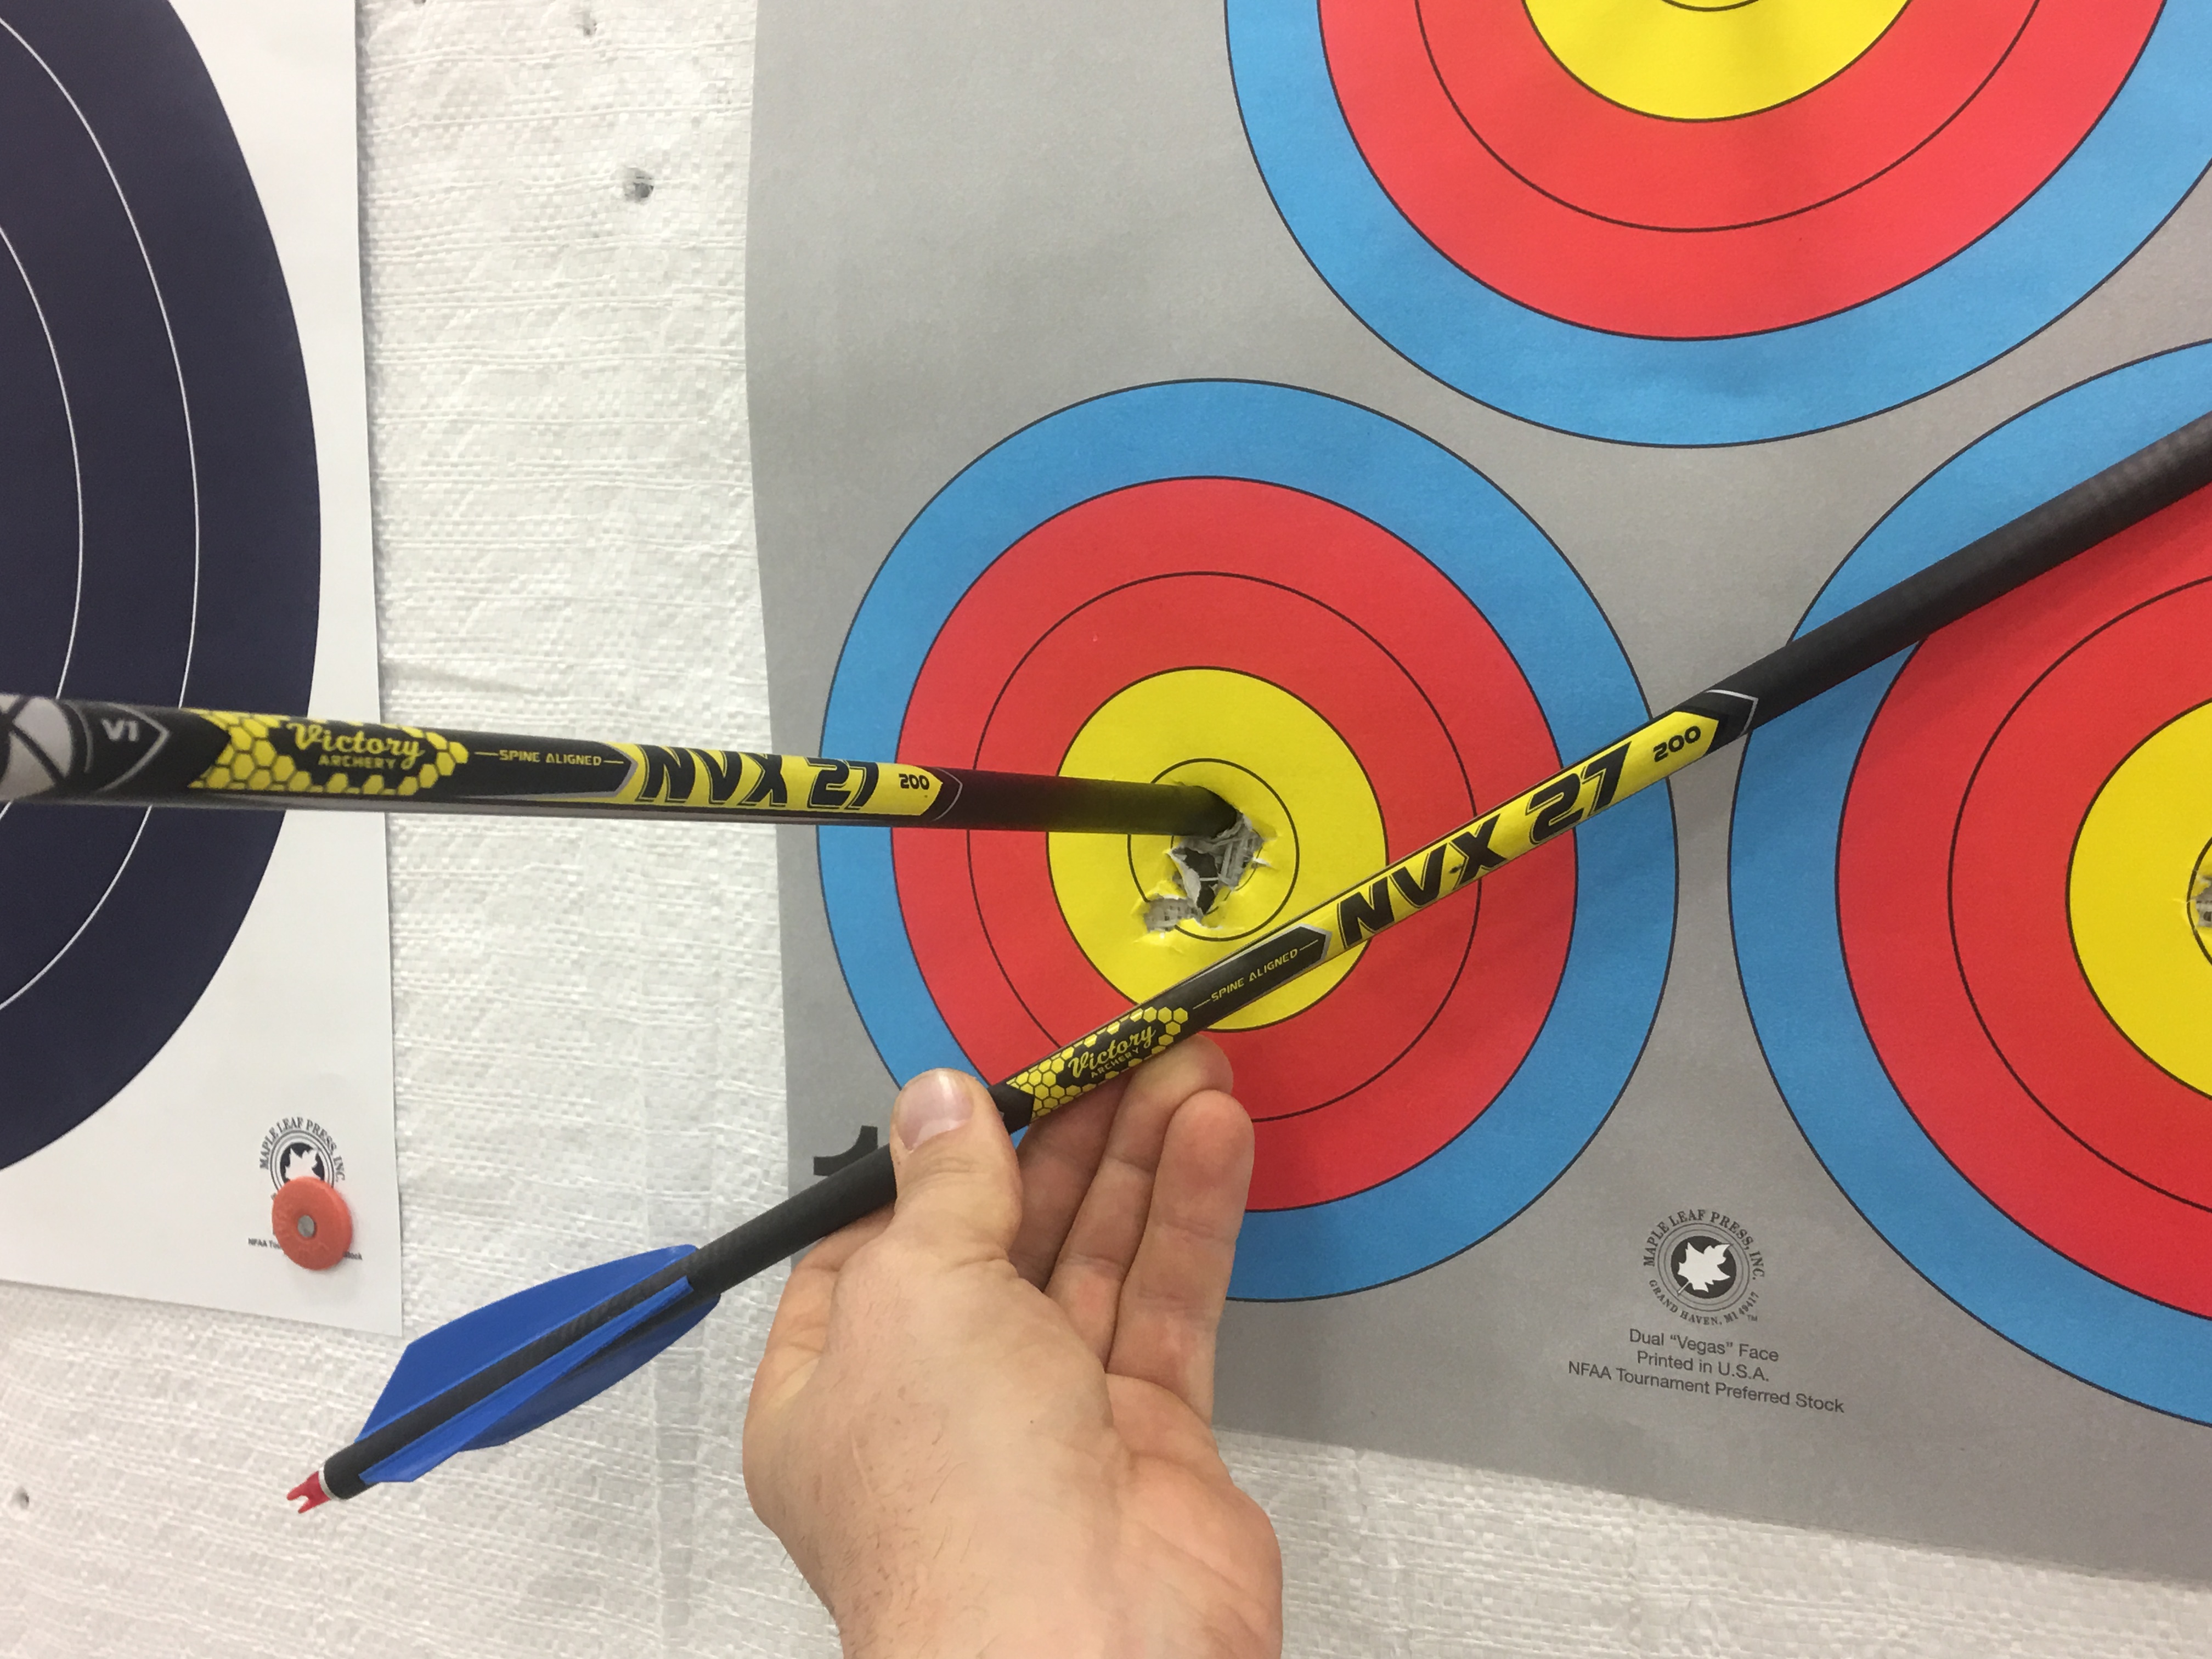
The arrows shot typically are the largest diameter possible. In the NFAA, this is limited to a diameter of .422", or an arrow that's considered to be a 27 series diameter. Examples of the most common makes and models are the Easton 2712 (which is the only one of the following that is an aluminum arrow, the rest are carbon), Victory NVX27, Carbon Express Tank 27, or a Gold Tip XXX. Most archers will use a heavy weight point to offset the stiffness levels of these arrows because of the large diameter. Typically these weights will vary between 150 and 250 grains. The vanes or feathers on the arrows are usually 4" to 5" in length and are fletched with a heavy degree of "off-set" or "helical", meaning they are angled considerably when glued to the shaft. This makes the arrow spin extremely fast when leaving the bow. The faster you can get your arrow rotating coming out of the bow, the sooner the arrow will stabilize in flight and be able to correct itself when several types of inconsistencies occur, which are always generated by shooter error. Besides of the short distances shot in indoor rounds, the combination of longer fletching, a more stable arrow platform, and generally a slower shooting bow (because of heavier arrow weights), in my opinion, is why indoor bow setups are not required to be as precisely tuned as other types of target or hunting setups to achieve phenomenal scores.
Understand that this is indeed a BASIC tuning guide and the information I provide in this series is more than adequate for most indoor shooters, and in some cases, all you need to build a highly forgiving setup. That said, there are certainly a LOT of small things to consider when building a precision target setup. However, due to time and space limitations, I'm going to walk you through just the basics. I'll also be referring throughout the article to the specific indoor setup I'm using this year. There are a ton of different manufacturers and models for all of the things you'll see in this article, I can't cover all of them but the basic concepts, regardless of the bow or components you use will be the same in regards to tuning.
Accessorizing and Installation
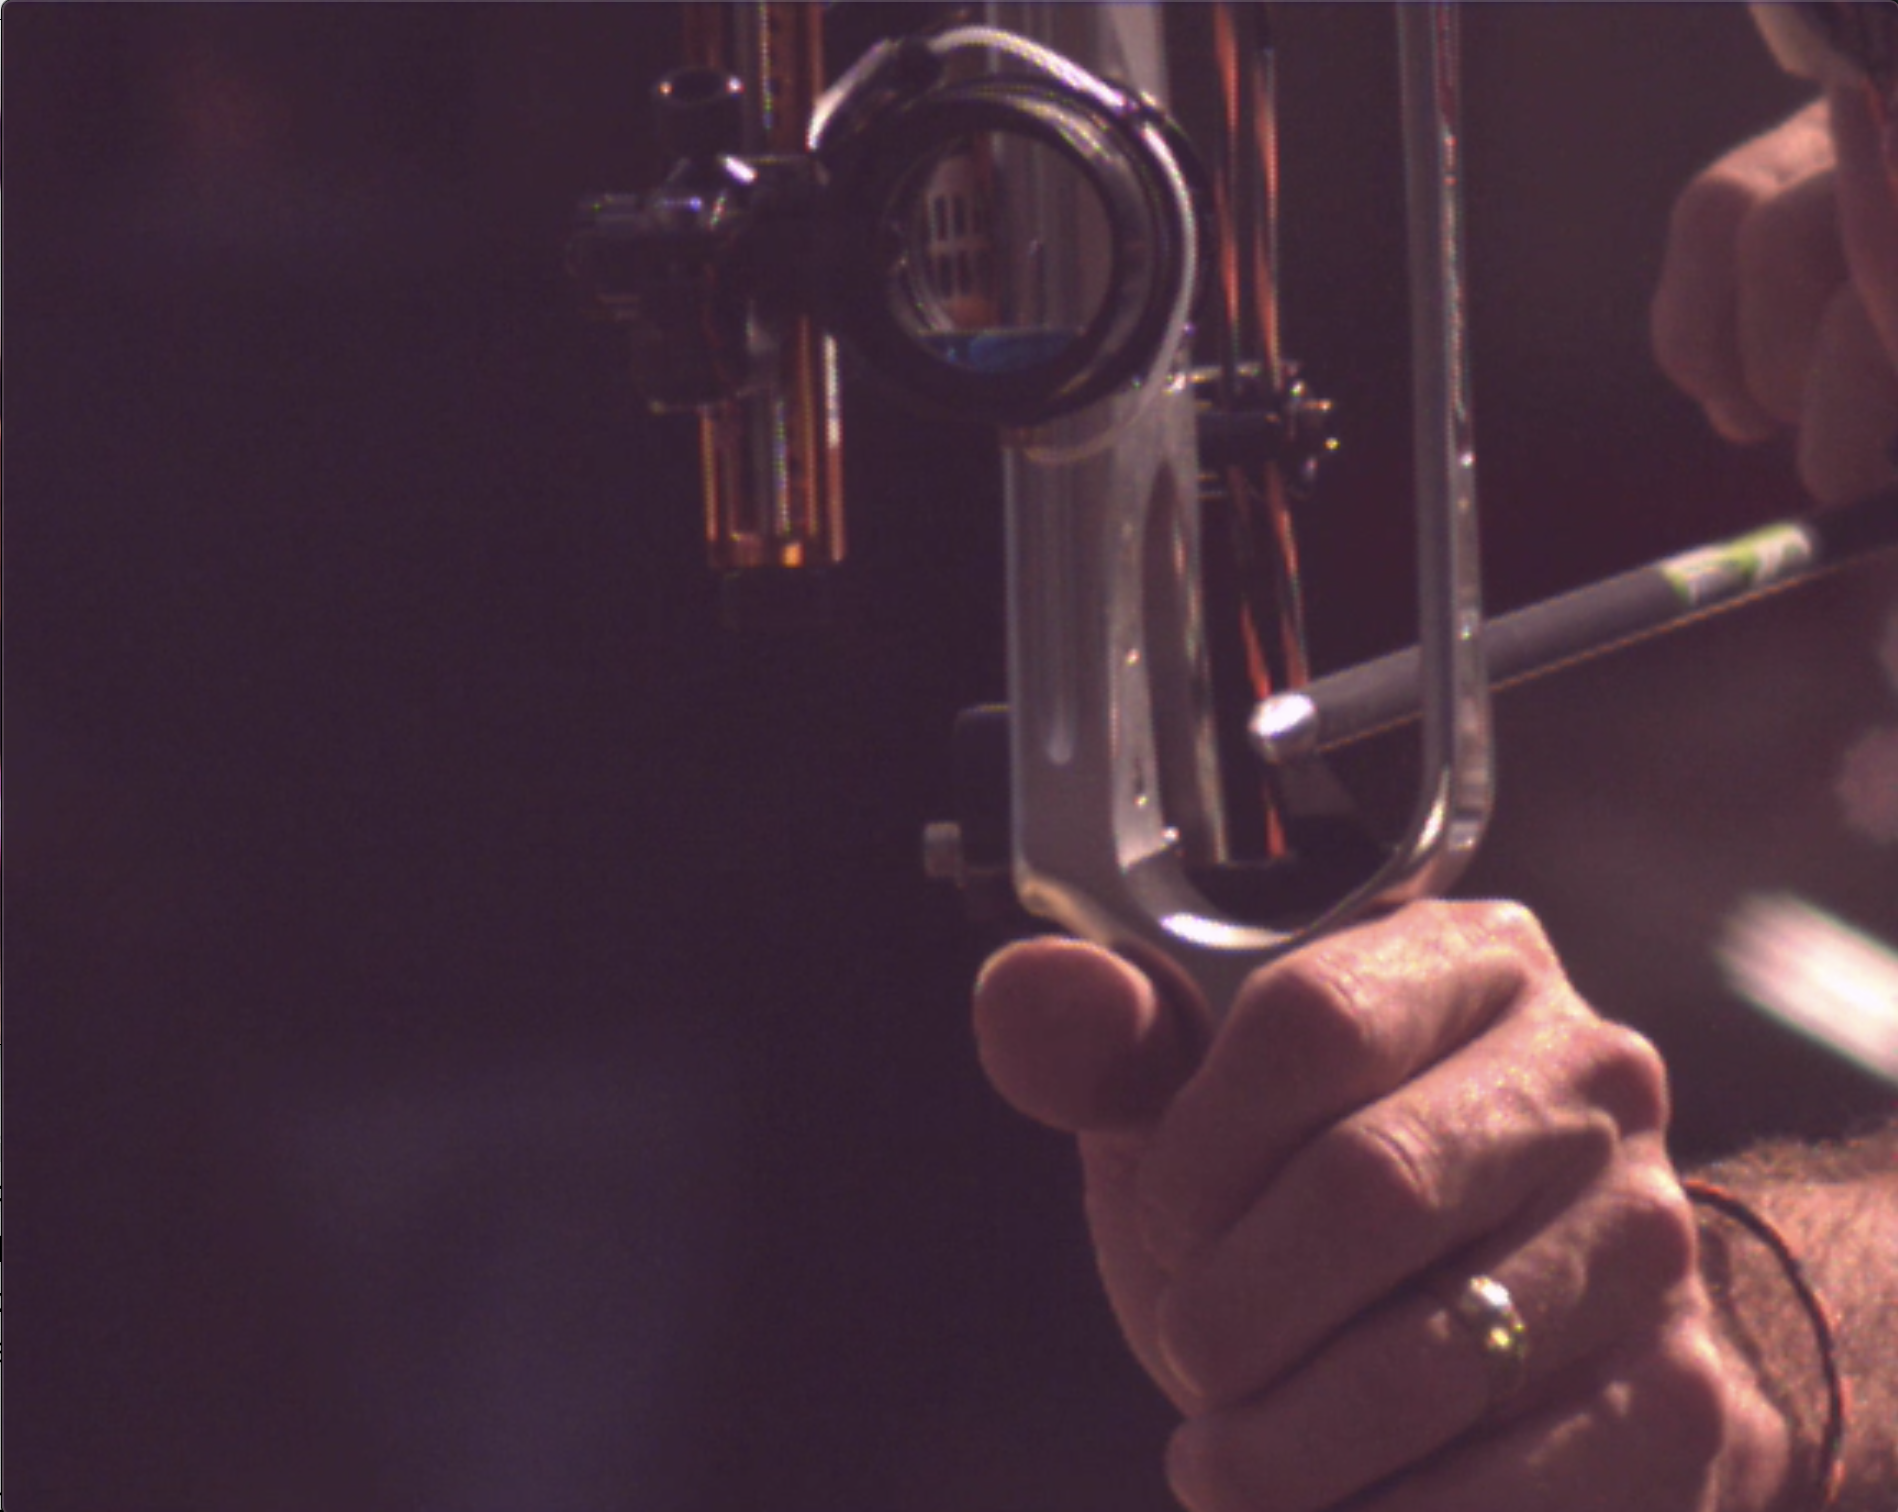
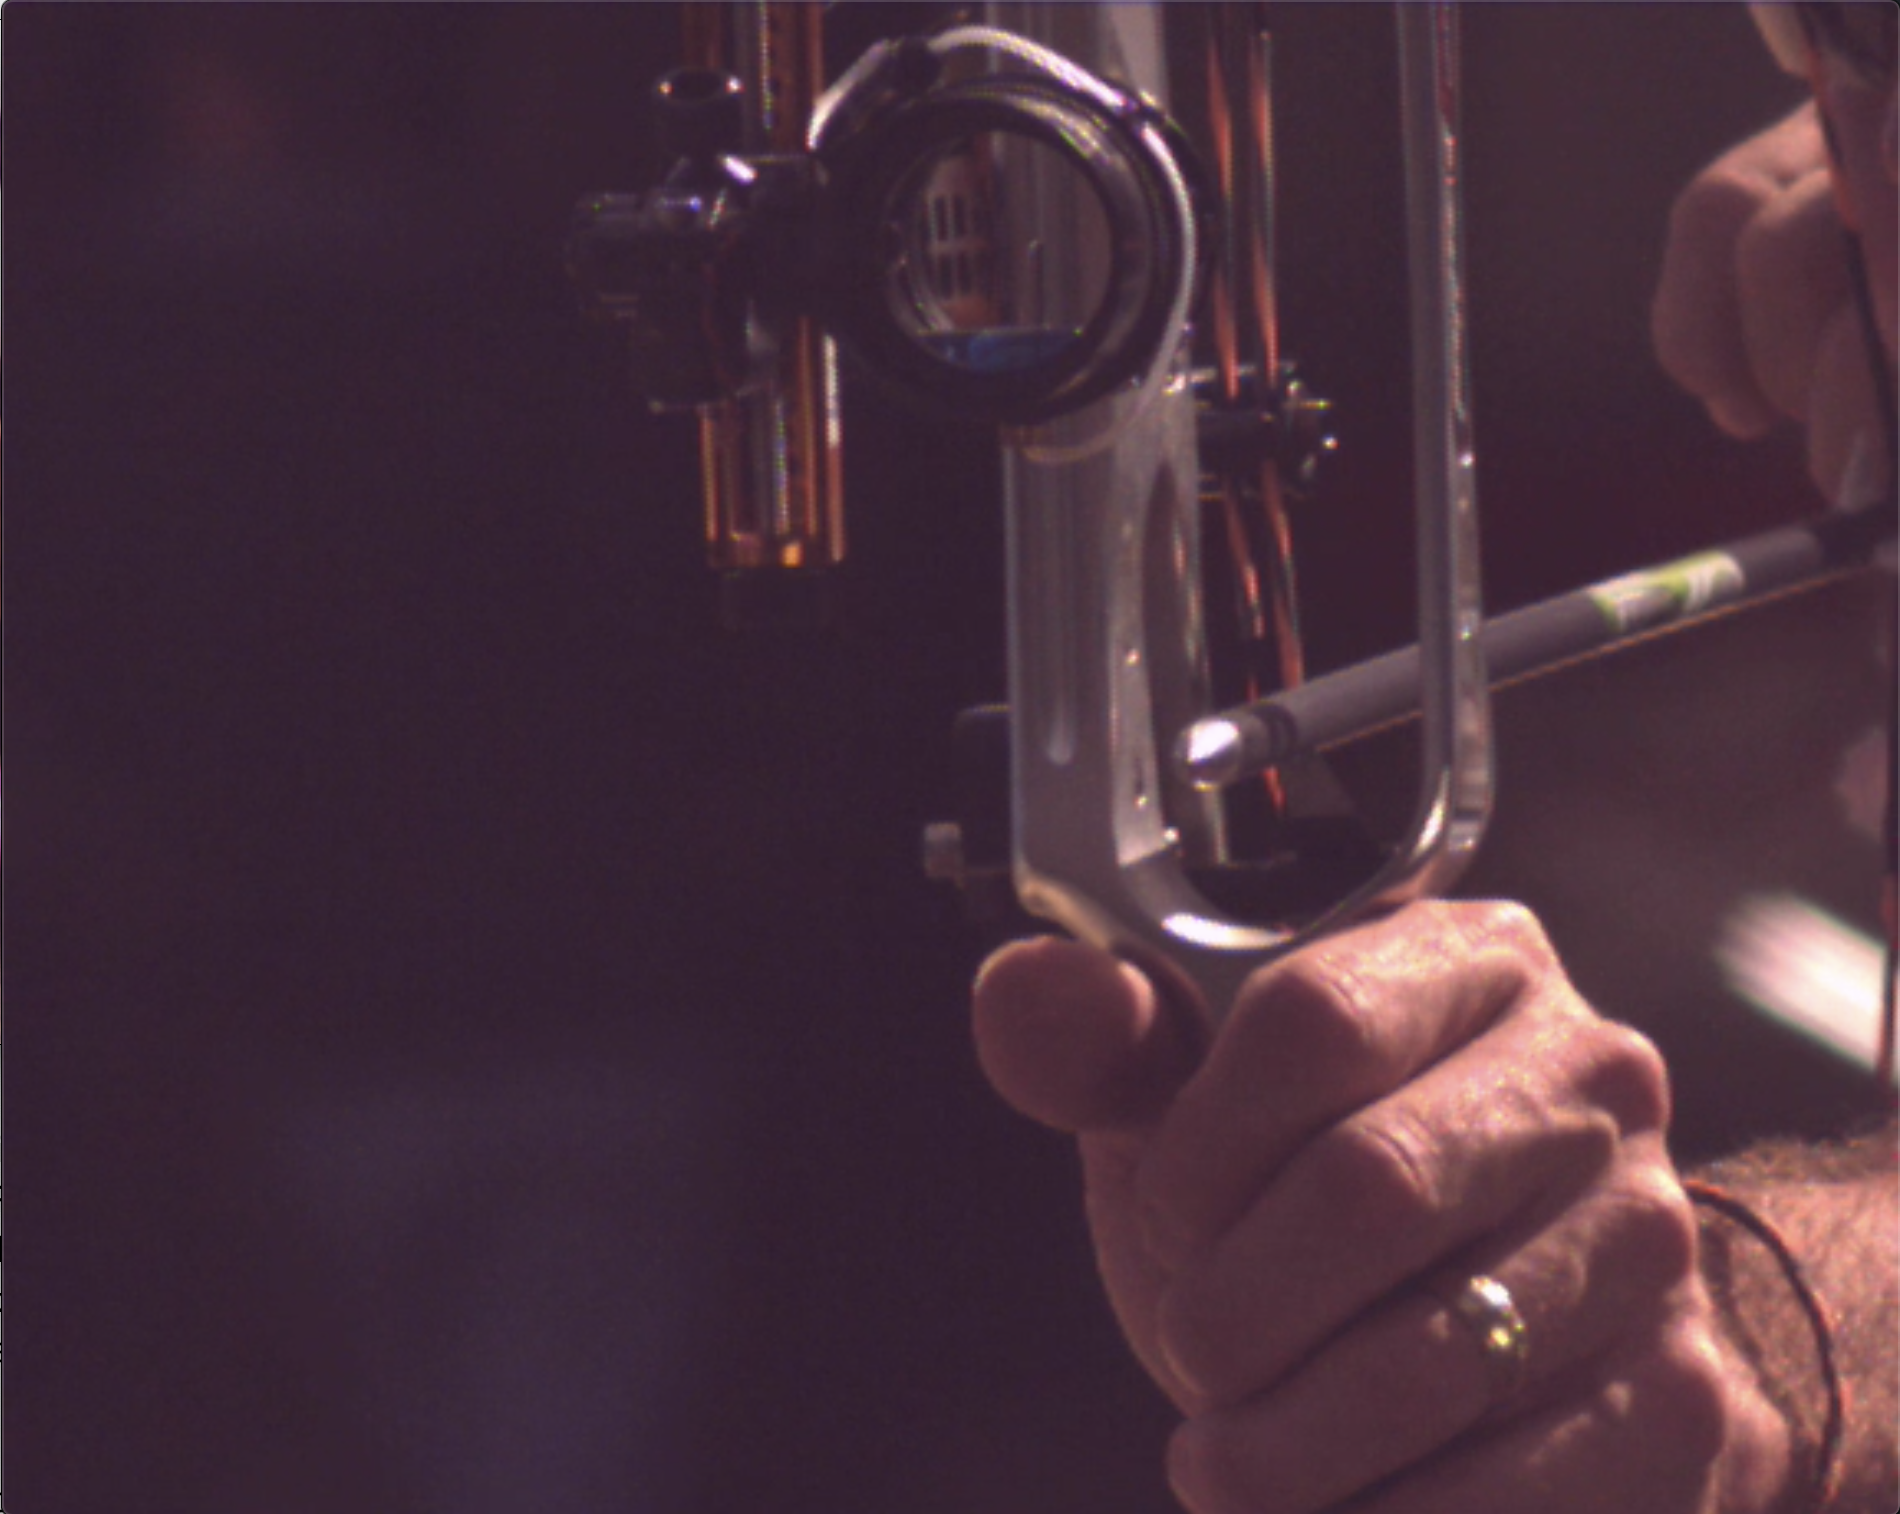
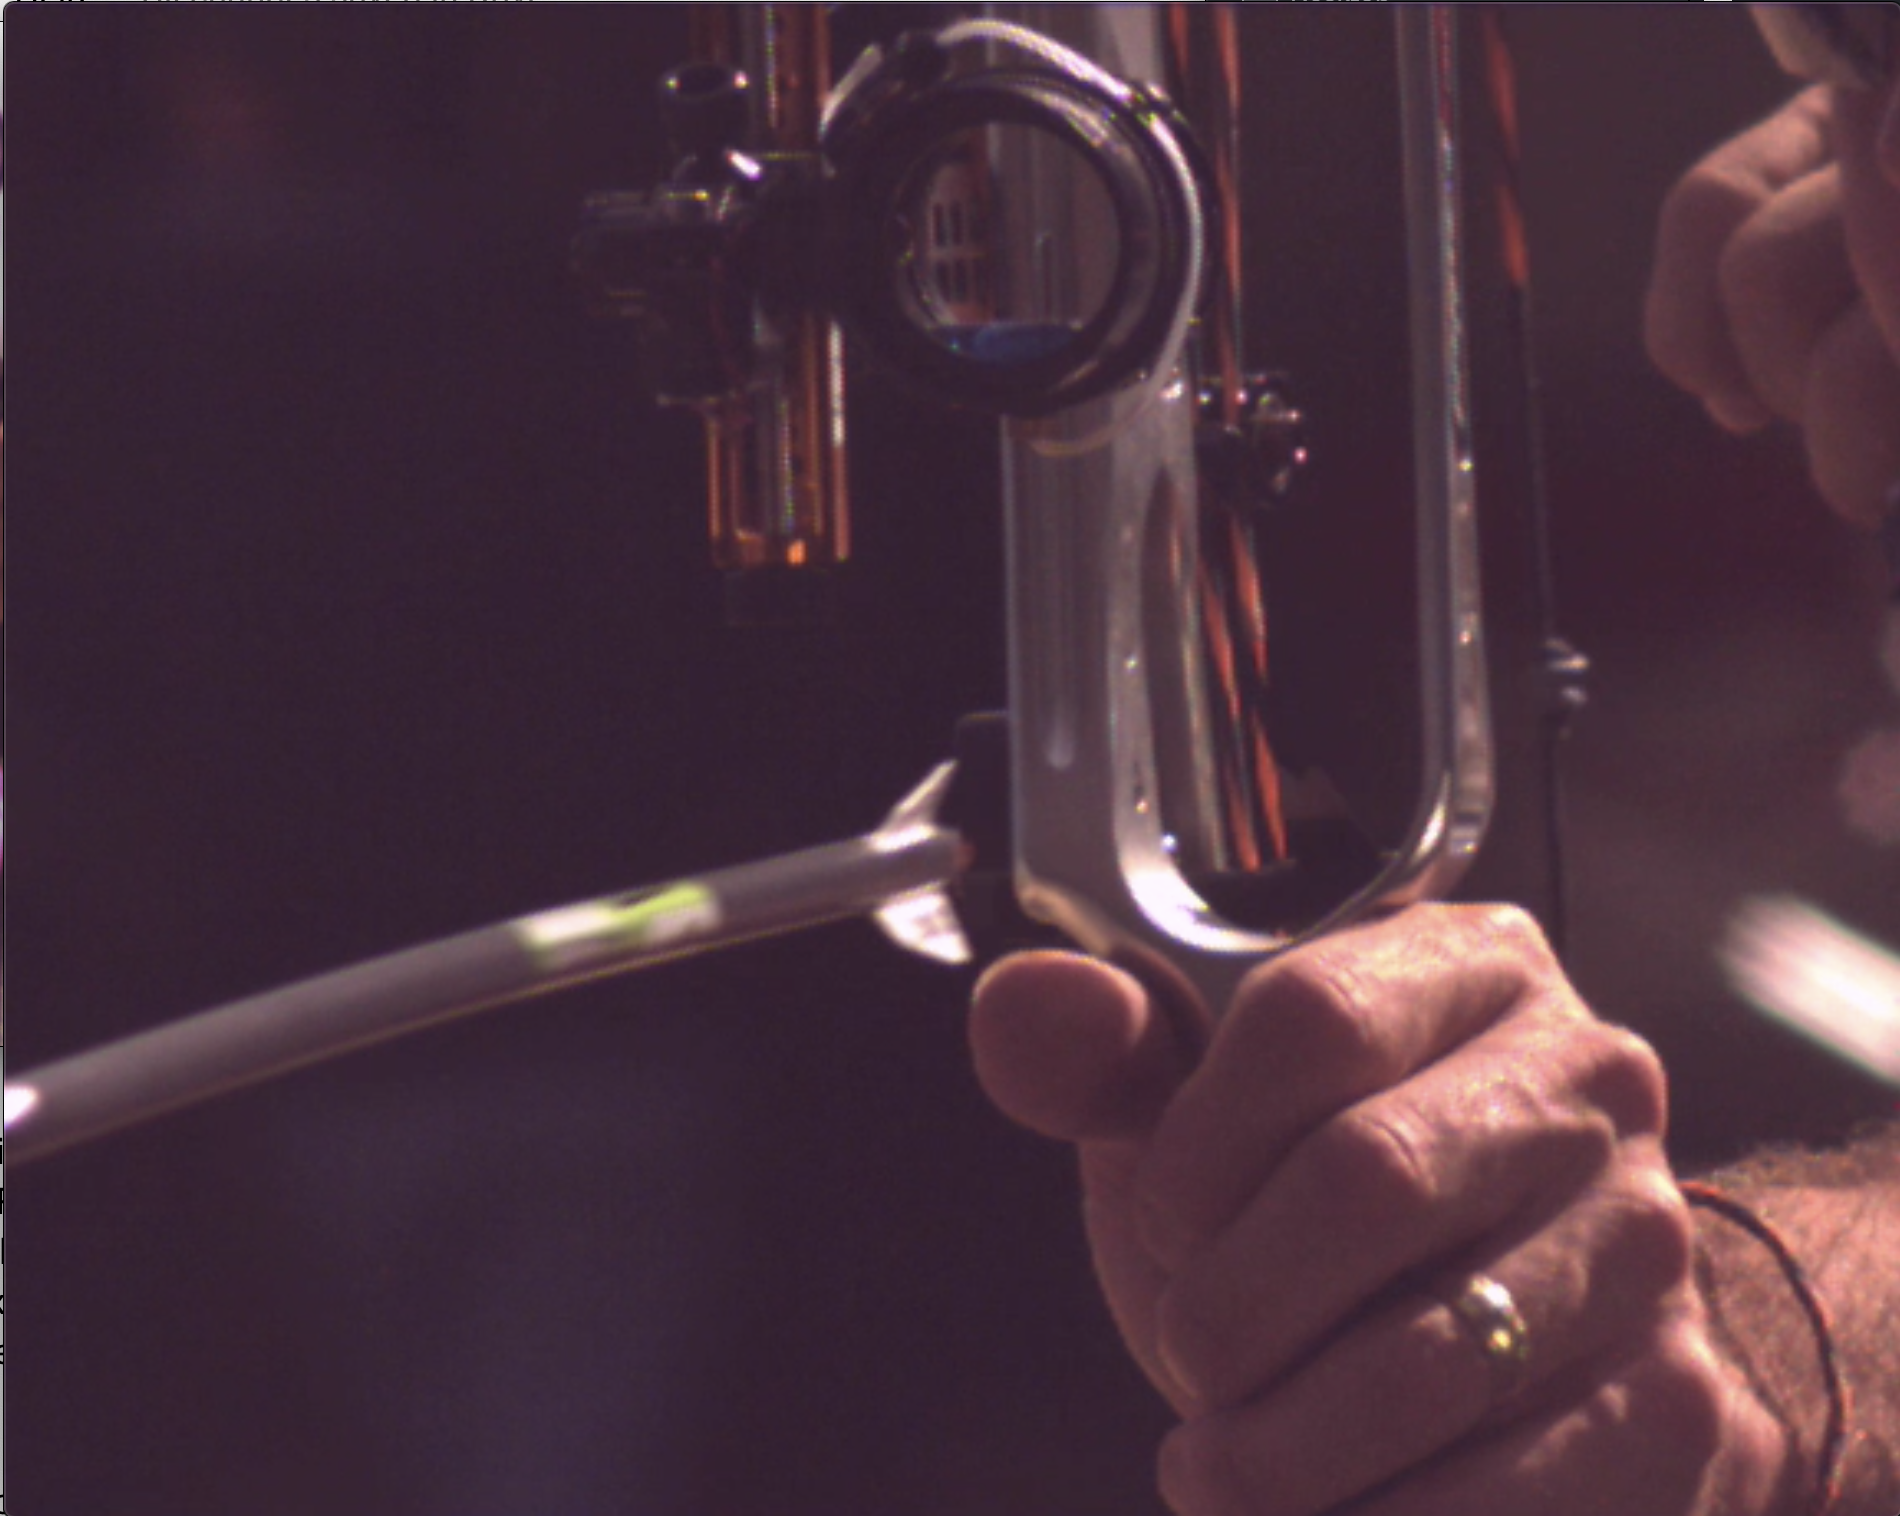
If you're not going to be using your existing equipment, here are some suggestions of what most would consider necessary to build a solid indoor setup from scratch. No matter what brands you choose or how much you have in your budget, the basic goal of the tuning process is to get the bow firing an arrow, with adequate clearance from your arrow rest, consistently from shot to shot. So...that brings us to the most important accessory you'll add to your bow, the arrow rest. Why is the arrow rest so important? Well, it is one of only two contact points your arrow has with the bow. However, it certainly does not need to be a complicated accessory.
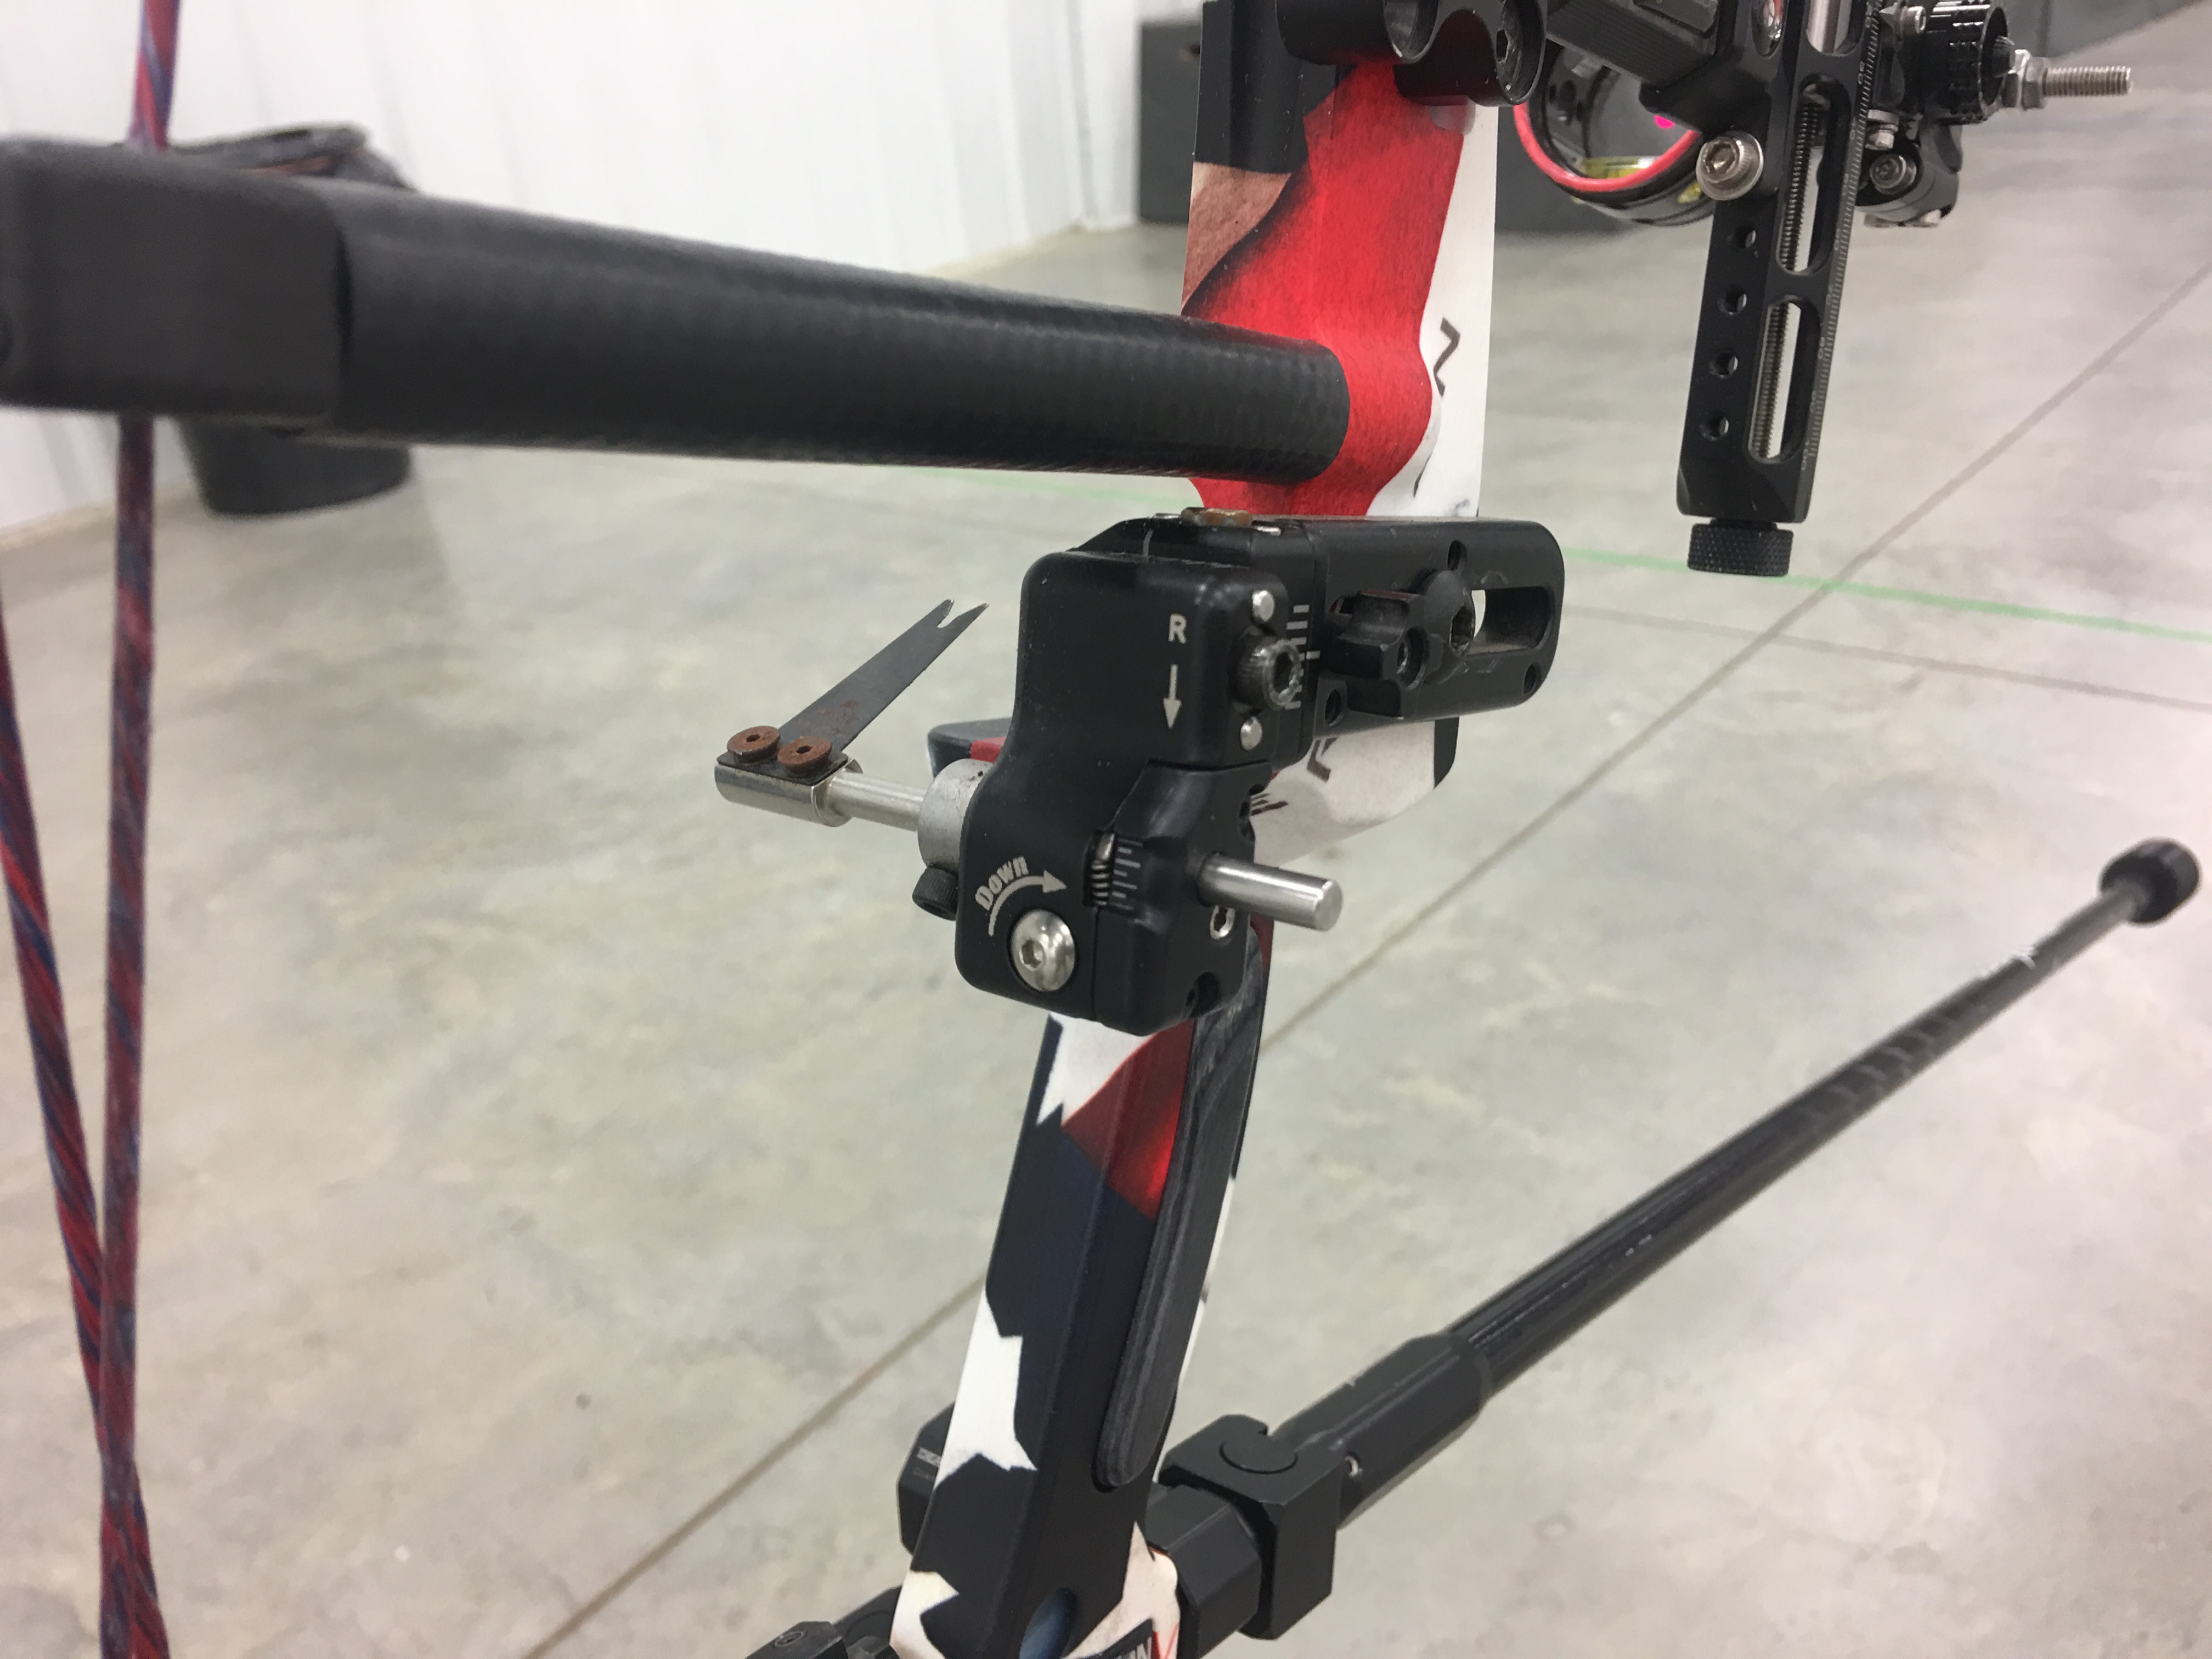
The simplest type of rest to use for indoor target archery is a standard lizard tongue style arrow rest. It's also the most popular amongst top target archers. This is a simple blade, generally made of .008 to .012 spring steel, and is mounted to a post that mounts to the arrow rest body, which is then bolted to the bow. World records are consistently set, and reset, year after year with this simple design. Yes there are dozens of manufacturers out there with everything from drop away mechanics to advanced, micro tuning capabilities. But at the end of the day, most of them simply hold your arrow up with that little piece of spring steel. The spring steel acts as a cushion, increasing resistance as the arrow begins to flex during the shot. The flex is caused from the force applied to the nock by the string when the release is activated by the archer.
MOST bows have some degree of nock travel in them. In my experience, many that even advertise straight line and level nock travel, when mounted to machine to measure it, have some degree of vertical nock travel. Meaning that when the string is released, the nocking point (and nock of the arrow) does not ride on a straight line and plane toward the bow. This will induce some flexing of the arrow, or it can magnify the flexing that occurs when an arrow is shot. Some of you will have heard this referred to as "Archer's Paradox". It occurs because when the nock is pushed by the string, the mass weight that is in the front of the arrow is slower to react than the lighter mass weight in the back of the arrow. That old law that states that, "An object at rest tends to stay at rest" applies here. Especially considering that ? to ? of the entire mass weight of the arrow is in the point of the arrow, if not more. Something has to give, unless of course that nock travel does indeed not exist. However, even a bow with level and straight nock travel as measured by a machine, doesn't guarantee that a human who is holding the bow, is not inducing some type of torque or uneven pressure into the grip of the bow. That flexing can increase or decrease when certain critical errors are made in the shooters form as well.
[embed]https://youtu.be/PoCsa84zLd8[/embed]

It's widely believed that the spring tension from the blade can reduce the effects of shooter error by taming excessive "Archer's Paradox" that can be created by a poorly shot arrow. I can't say for sure I entirely subscribe to this theory with a compound and release, but I can tell you that from my experience with the extreme flexing that arrows do experience, when shot from a recurve bow with fingers, where spring tension from the cushion plunger on a typical recurve rest occurs (creating horizontal nock travel rather than vertical nock travel, because of the side to side motion generated when a string is loosed by your fingers, rather than a release), definitely can tame the effects of a poorly released string. When a recurve bow is properly tuned, that side tension from the cushion plunger allows the archer to get away with a lot more mistakes downrange. In any case, I feel that there is some validity to the forgiveness variable of a spring steel, blade type rest design versus a rest design that does not have a flexible launcher blade.
Another option is a drop-away or mechanical fall-away type arrow rest, which most often uses a launcher blade made of plastic or stainless steel that does not flex. These types of rests can have a level of confidence, that clearance issues from large feathers or vanes will be a non-issue. But only if they are set-up properly. Set up improperly, some models experience issues where the launcher often bounces back up from contact with the riser, or shelf, of the bow and can interfere with the fletching as they pass over the grip. Additionally, the rate at which the arrow rest begins to fall must be considered during the tuning process and can be difficult to understand without the use of an ultra-high speed camera (not an iPhone camera).
Lastly, if you subscribe to the theory of a spring steel type rest functioning as a cushion for absorbing abnormal flex from a poorly shot arrow...well most all fall away arrow rests don't allow for that possibility. The only company that I am aware of that does make a spring steel blade on a "drop away" is AAE. Initially I loved this concept, except that you add an additional element of complexity. As the tension is relieved from the fall away portion of the rest throughout the shot process, the blade resistance to the weight of the arrow, and flexing of the arrow becomes variable as the string travels toward the riser. Not to say this is good or bad, I just prefer to keep things as simple as possible. I choose a simple blade rest myself because it's just that, simple. I choose the Spot Hogg Swap Rest simply because the module that holds the blade in position is interchangeable with a simple turn of a thumb key and I can swap it out from a large diameter arrow setup to a small diameter arrow setup, using the same bow for different purposes. And, aside from the very rare instance of a broken blade (which almost always indicates severe contact or tuning issue) or someone accidentally bending a blade, simple static blade rests are pretty bullet proof options.
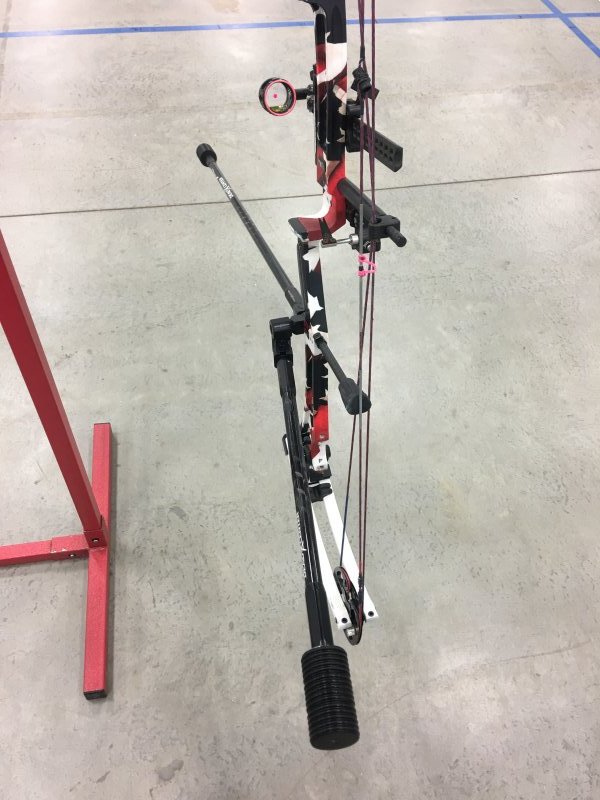
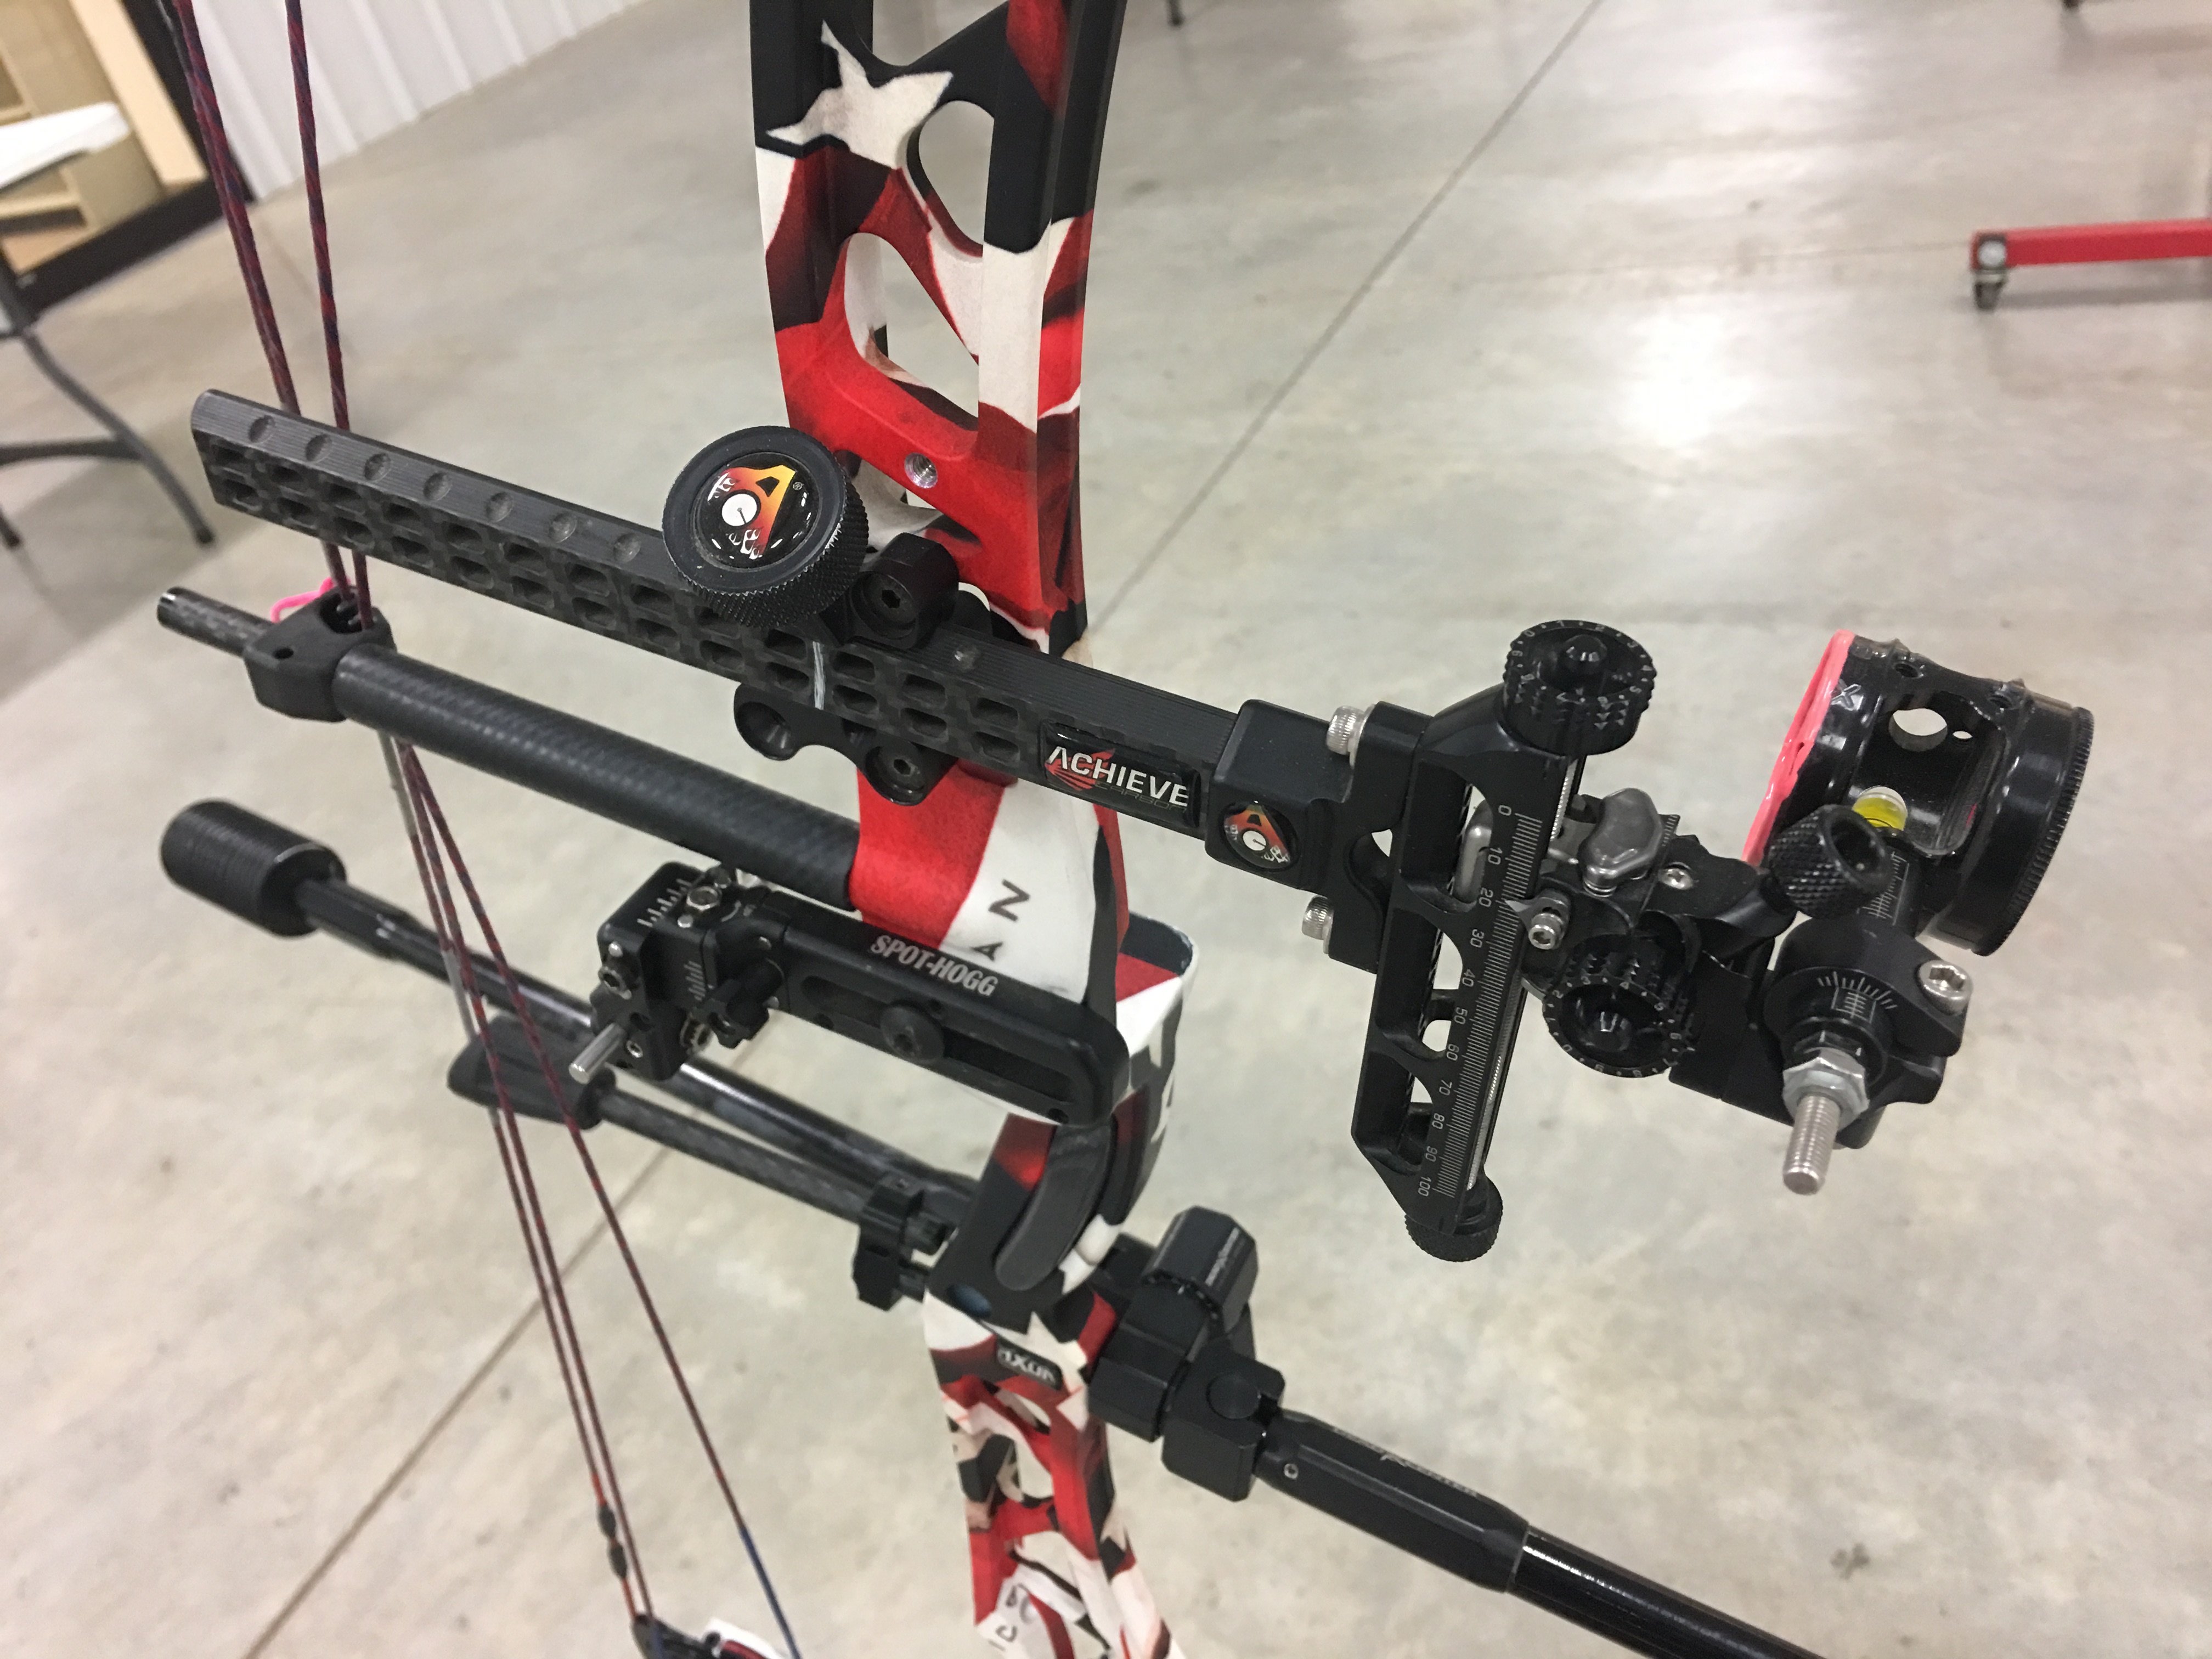
Next is the stabilizer options. Unless you're shooting in the NFAA bowhunter division, I don't believe there is a length limitation. However, traditionally, most adults shoot a forward stabilizer that's 26" to 33" in length. Today, I would say the majority of archers also shoot a single back stabilizer bar that is 10" to 15" in length, generally angled down and slightly away from the bow, on the side of the bow opposing the sight. Other archers choose to use a "V" bar type set-up with two bars pointed backwards off the riser of the bow, angling away from one another. Initially, all you need to know about choosing a stabilizer setup, is that the concept is to use the lightest stabilizer bar possible to extend a solid, variable weight, as far away from the bow as comfortably possible. When configured correctly, the stabilizers will significantly reduce the amount of motion an archer sees in his or her scope or sight pin while aiming. You're height, strength, and grip, all depend on which setup is right for you. My suggestion would be to try a variety of setups to see which works best for you. There is a significant amount of information on this subject, and one I may go into at length in another article, but the basic concept is to find something that will help you aim more consistently, with less sight movement, by adding it to your bow.
Now you'll need to add a sight to your bow. Most archers in the Freestyle division, select a micro adjustable sight with a single pin or scope attachment. I would say that the more you spend, the better off you'll be in regards to sights and scopes. You USUALLY get what you pay for in this category. Especially when it comes to the lens department. If you shoot a fiber optic pin, or a dot on a lens, without magnification, this is obviously a non-issue for you. But most archers that shoot with a scope, also shoot with a lens. Typically indoors, most archers also choose a 4 to 6 power magnification lens, with one of three aiming options. A dot scribed into the lens, a dot applied to the center of the lens to aim with, or a fiber optic pin and lens combo. Finally, this brings us to peep selection.
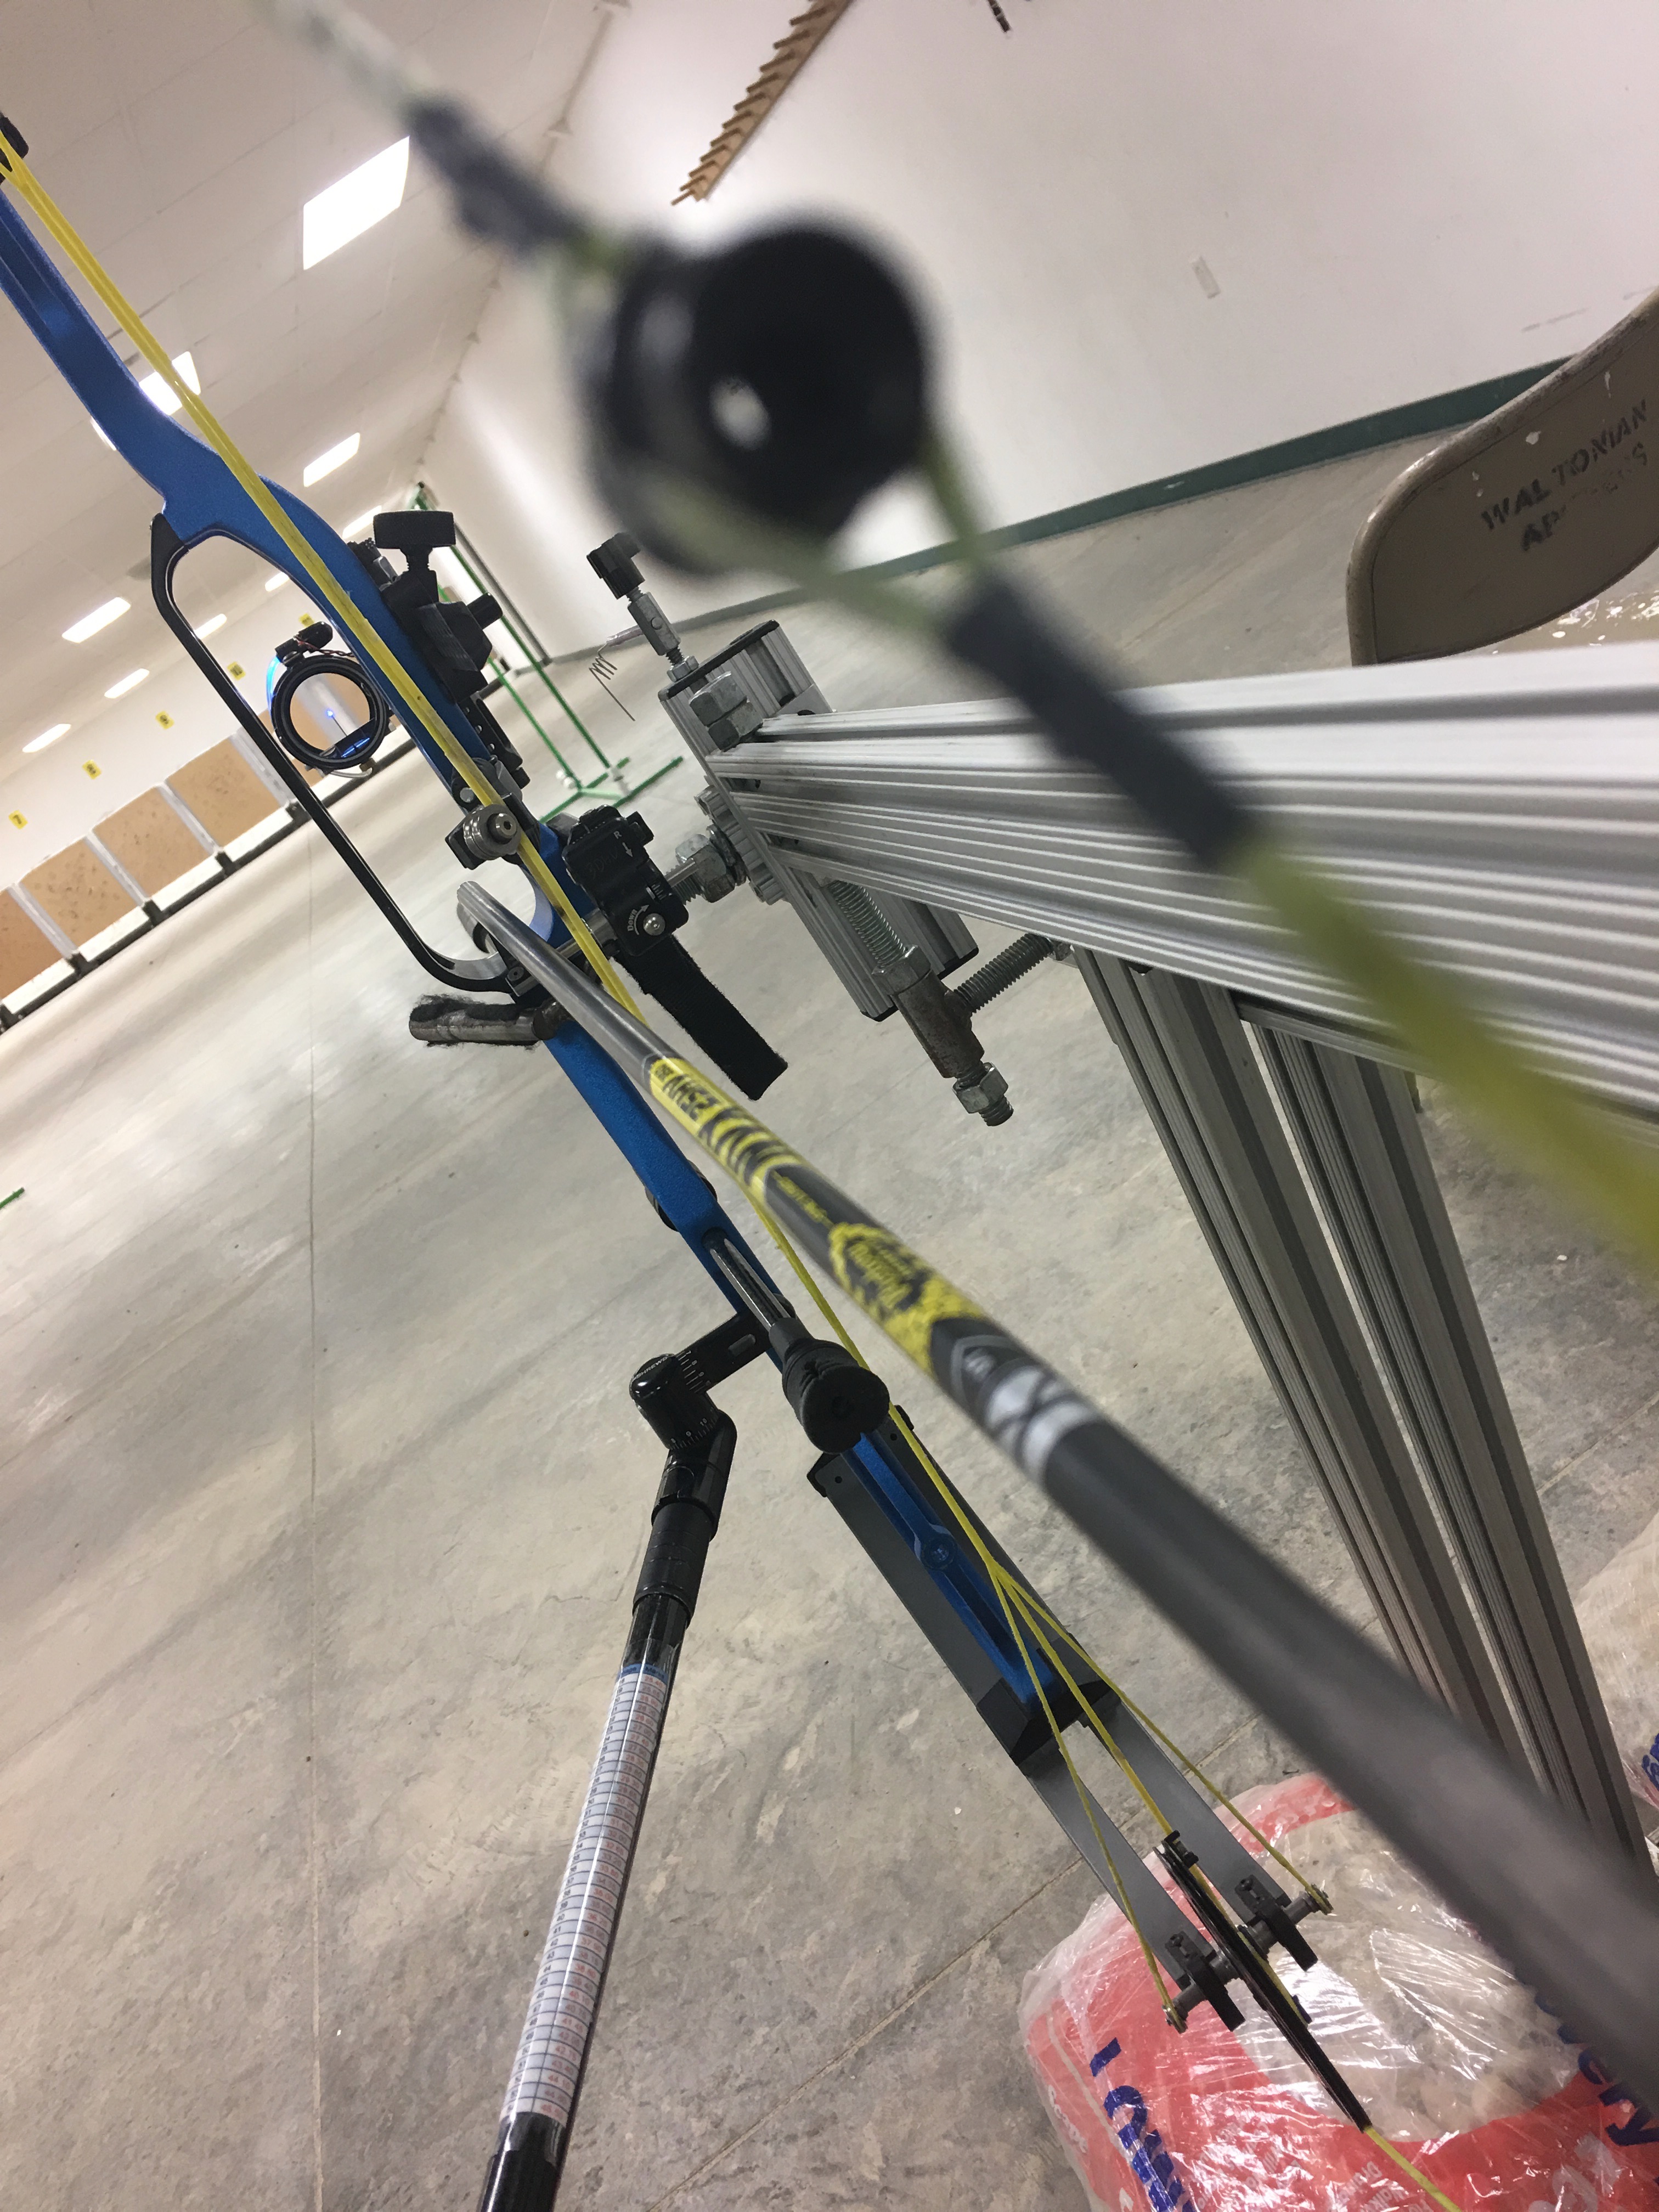
It's critical when choosing your scope housing, that your peep sight will allow just a little bit of light around the scope housing, when you look at your scope housing through your peep sight at full draw. I even paint my housing a bright pink to make sure I have it centered in my peep housing at full draw. This is critical to repeatable accuracy. You can do everything perfect in your shot execution, but if your peep and your scope housing isn't lined up consistently shot after shot when the release is fired, your arrow will impact differently each and every time. Both Specialty Archery and Hamskea Archery are the two most popular peep manufacturers on the target line that offer a peep with the ability to change the size of the aperture in the peep housing itself. I'd strongly recommend using a peep system like this, as it allows you to change the size of the aperture based on the various types of lighting you'll be shooting in, in various buildings. Both of those products will also accept a variety of lenses within the peeps, called clarifiers or verifiers, to help you see the target more clearly if that's a concern from you as an individual. However, most professional shooters that I know, do not shoot with a clarifier or verifier lens inside, they're most commonly used for 3D archery where clarity of the target is extremely important. Since you'll be shooting primarily at round targets indoors, identifying hard to see scoring lines and aiming points aren't a consideration unless you indeed plan to use this same type of indoor setup for indoor 3D targets.
-
Article by Rod White | NFAA Bowhunting Coordinator, Professional Archer and Bowhunter